Welcome to 8tyOne

Knowledge Transfer Hub

知識伝達ハブ

2 0 2 4
0 1 0 3
0 0 8 a
0 5 0 3

This page is a comprehensive repository of the methodological and technical insights I've acquired through my journey in concept design, showcasing my experiments and experiences with a diverse array of tools. このページは、コンセプトデザインを行う中で得た方法論的および技術的な洞察を総合的にまとめたもので、様々なツールを使った実験や経験を展示しています。

Design Bits & Tutorials

デザインの断片とチュートリアル

This knowledge transfer hub is divided into two parts. The first part is a glossary-style list of 'design bits,' where I present brief tips that can enhance design quality, streamline the design process, or provoke thoughts on challenging established design approaches and patterns to create something unconventional, interesting, or novel. The second part offers more detailed tutorials on 'how to do or achieve' specific design elements using the tools I employ.

Design Bits

デザインの断片

Asymmetry | 非対称性

Asymmetry is the violation of symmetry. Asymmetry is an important characteristic in biological organisms. Benefits of asymmetry sometimes have to do with improved spatial arrangements. From industrial design perspective the division of functionality between right and left may be beneficial too. In terms of efficiency and costs redundant components can be substituted and may lead to asymmetreical design. Deliberate usage of asymmetry can make a product more interesting, less monotonous and more useful especially in terms of enhancing the user experience.

Doodle | ドゥードゥル

Whether it's a small model or a huge scene, and even if you're not great at sketching, you should still do doodles! It's important to bring your ideas to paper before opening your 2D/3D software. Doodling helps identify the main elements of your scene and refines your overall concept. It's better to spend time doodling than to waste hours struggling in your 3D software, regardless of your drawing skills.

Modularity | モジュラリティ

In industrial design, modularity is a key engineering technique that enables the creation of complex systems from smaller, independent subsystems, demonstrating versatility across various fields. In graphic design, particularly in the 8-bit and 16-bit video game era, modularity was exemplified through pixel graphic tiles, which were used as fundamental elements to construct intricate visual landscapes. This approach not only addressed technical limitations of the time but also fostered innovation and creativity, significantly impacting the gaming industry and beyond. Architecture Decomposition
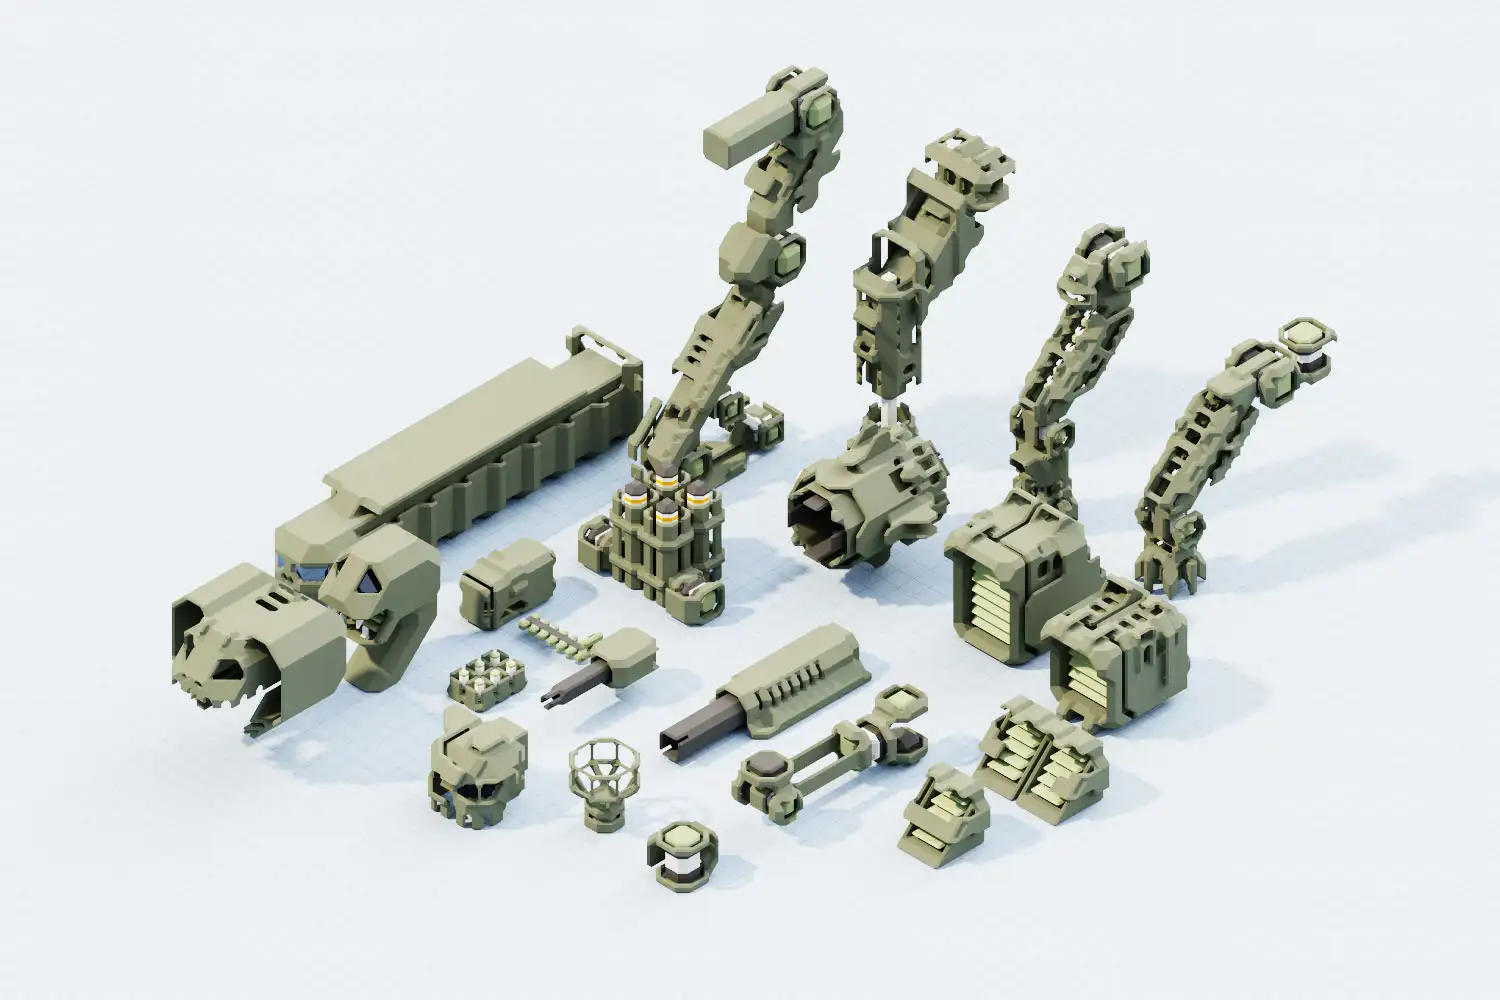
Modularity of Design - デザインのモジュラリティ

Prototyping | プロトタイピング

In industrial design, prototyping plays a pivotal role. Early prototypes provide the first hints as to whether design proportions make sense, whether transitions between surfaces are consistent, and if the color schemes appeal to the eye. Prototyping can be adapted to graphic design as well. For example, prototyping 3D scenes, especially industrial designs in Magicavoxel, can boost the ideation phase while quickly delivering design variants. Compared to other 3D graphic tools, Magicavoxel has a relatively moderate learning curve. Modeling is intuitive, render settings can be configured within a minute, and the final image is rendered in a minute as well. Furthermore, this software can export marching cubes models (including surface colors), which can be used as a starting point for polygon modeling in software like Blender.
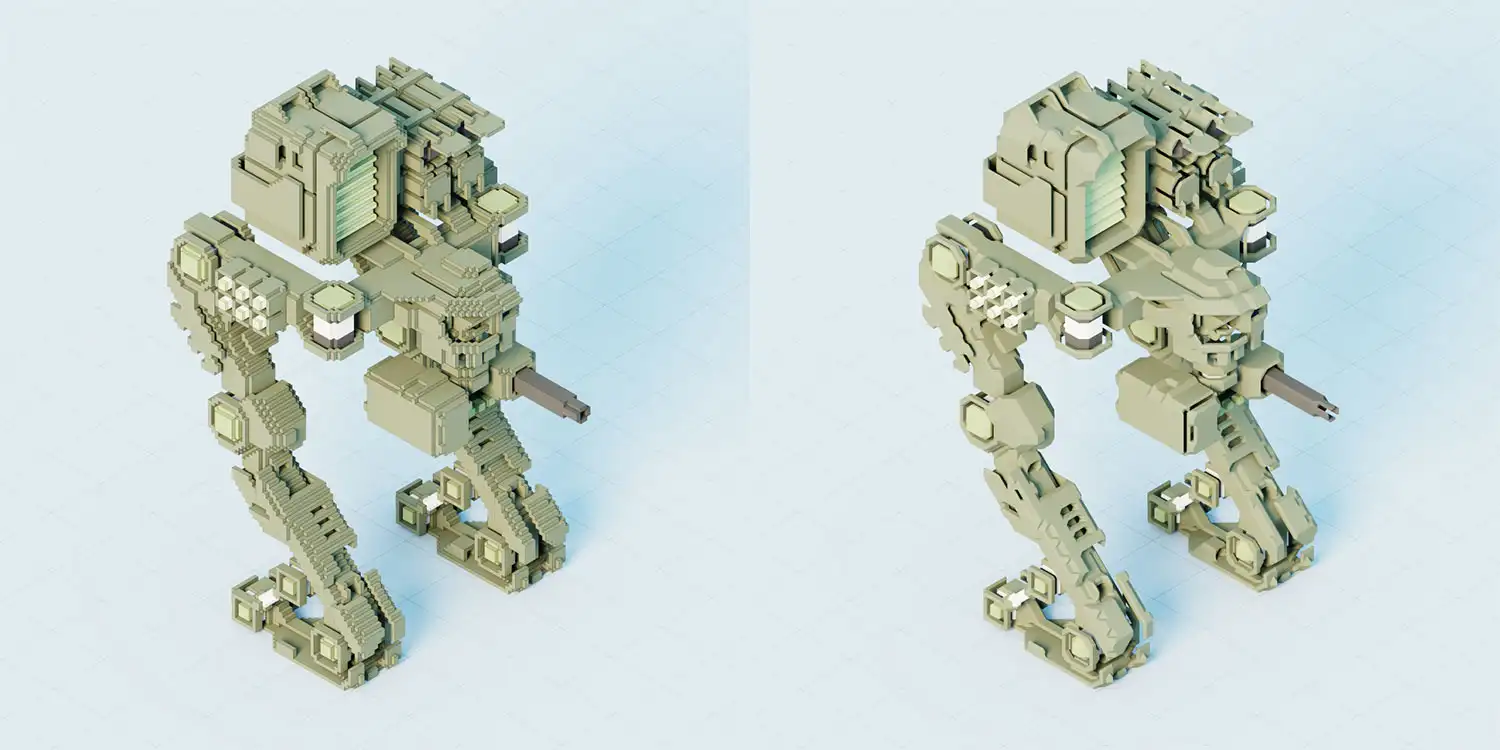
Voxel vs. Marching Cubes
Prototyping of 3D industrial design with voxels and marching cubes - 3D産業デザインのプロトタイピング:ボクセルとマーチングキューブを使用

Readability | リーダビリティ

Readability in pixel art is essential for ensuring that viewers can easily recognize and comprehend the visual elements in the artwork. This clarity is especially important given the limited resolution and small pixel size characteristic of pixel art, which are critical factors in effectively transmitting the desired message or imagery. Importantly, the principle of readability extends beyond pixel art to encompass other genres, including voxel art and both low and high-specification graphics. To achieve optimal readability, it's advisable to begin modeling with the object's smallest, or atomic, features. These atomic features should be distinct and easily distinguishable from other elements, such as the eyes of a character, which are crucial for depicting facial expressions. Embracing a "less is more" philosophy, strive to create the model with the minimum necessary pixel, voxel, or polygon count. This approach echoes the practices of old-school 16-bit graphics, where limited resources necessitated a focus on the most essential details for clear and effective visual communication.


Tutorials

チュートリアル

Realistic Voxel Grass

Realistic Voxel Grass
Realistic Voxel Grass Tutorial

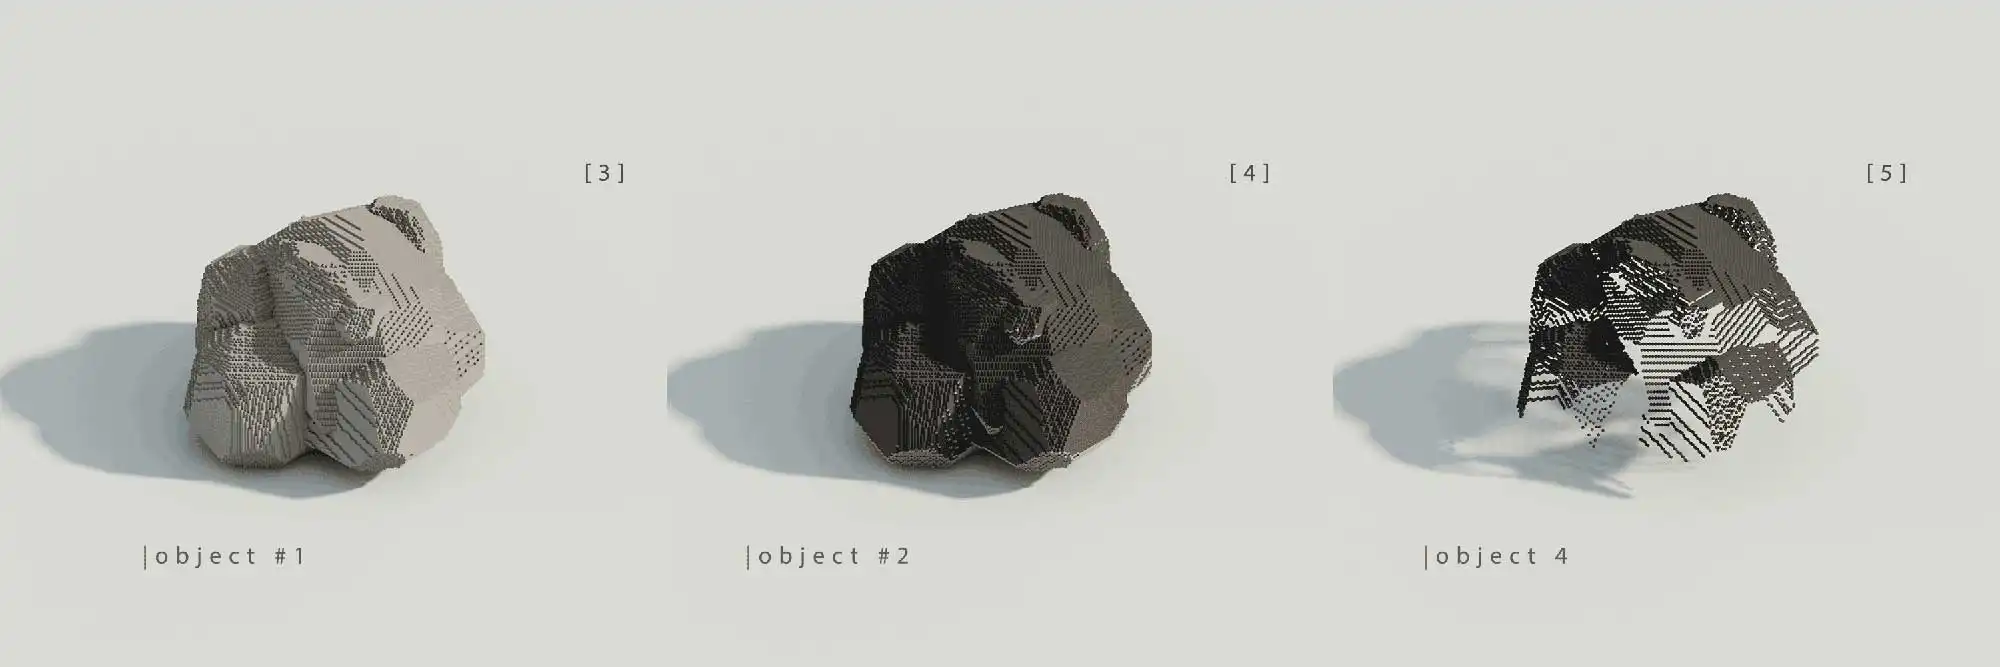
It is not easy to create realistic grass on complex surfaces [01] inside MagicaVoxel without using 3rd party shaders. However there are techniques that can be very helpful to support the manual process. To do so we 1st define a base object where we want to put our grass on. Here, I use a grey rock (object #1) [3] as a support surface. My model volume is 126 x 126 x 107 voxels. Important, the rock must be solid. Means, the whole volume of the rock geometry must be free from empty space. In this case we apply the flood command to fill all empty spaces.

Tut 1

Next we copy the rock (object #2), translate it by +1 voxel towards positive z axis; and apply dark grey colour [4]. We make a 2nd copy (object #3) of the 1st rock (object #1) and apply ‘operand’ property from Boolean menu.
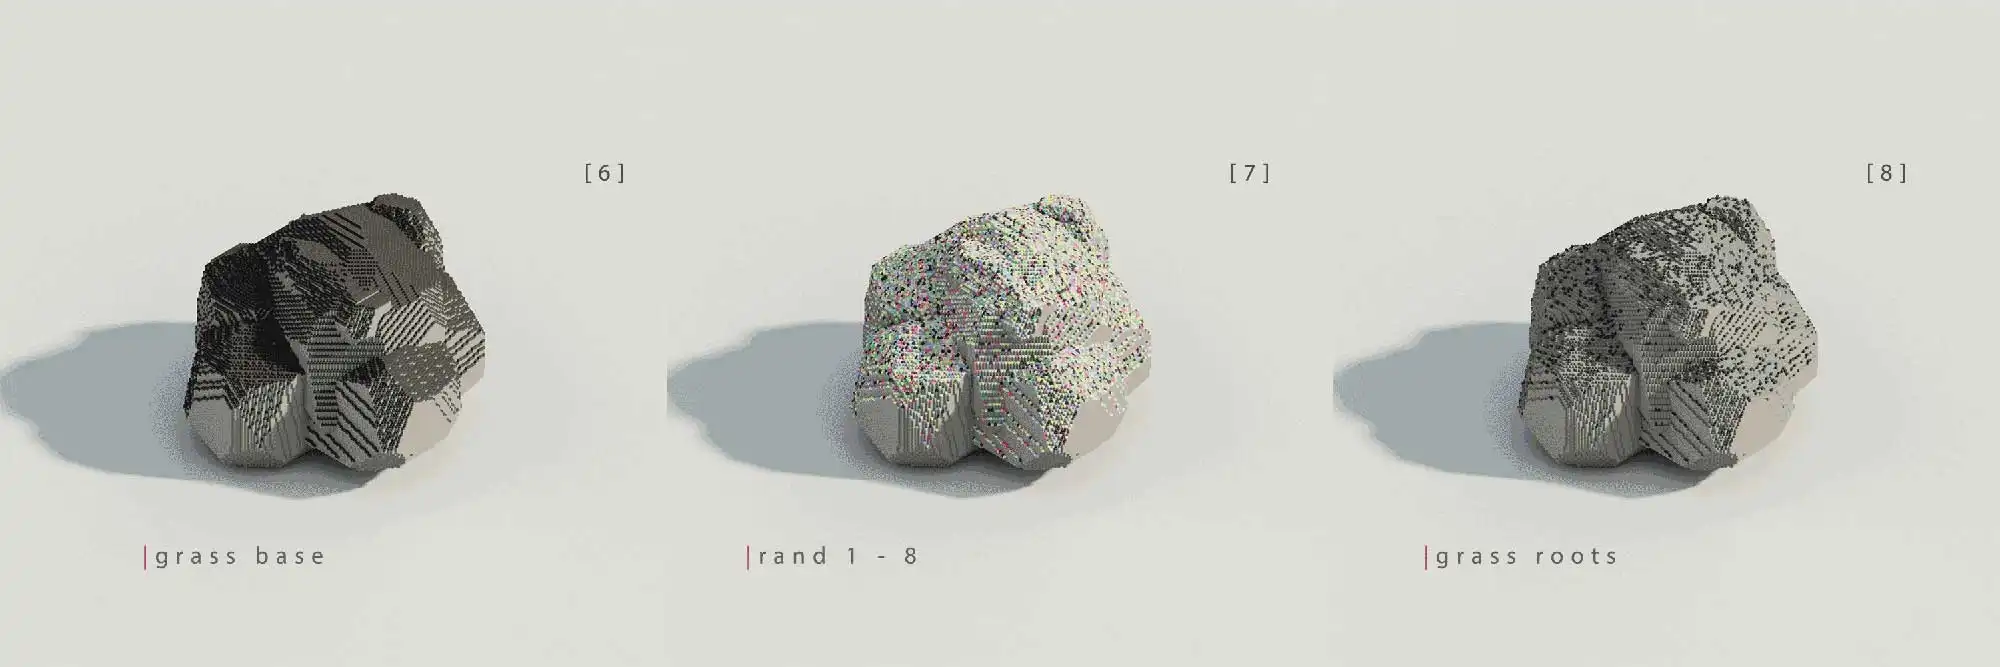
Now we select the dark grey rock (object #2); and apply ‘sub’ property from Boolean menu. Technically, object #3 cuts out all voxels from object #2. The result is that only the top-level voxels from our dark grey rock (object #2) remain. By doing this, we generated the base (object #4) [5] of our grass or low-level ground vegetation. All voxels of that base are nested now on the 1st rock (object #1) [6].

Tut 2

We select all voxels of the base (object #4) and execute rand command ‘rand 1 – 8’. This command applies one random colour from the first 8 slots in your colour palette [7]. Now we take the region selection tool and select 7 differently coloured voxels. Thus voxels with the last colour remain un-selected. We delete the selected voxels. By doing this we generated the individual roots of each grass blade (object #4) [8] directly located on the surface of the 1st rock (object #4). Additionally, we can now thin out the grass roots by manually deleting single voxels. But this really depends on the application.

Tut 3

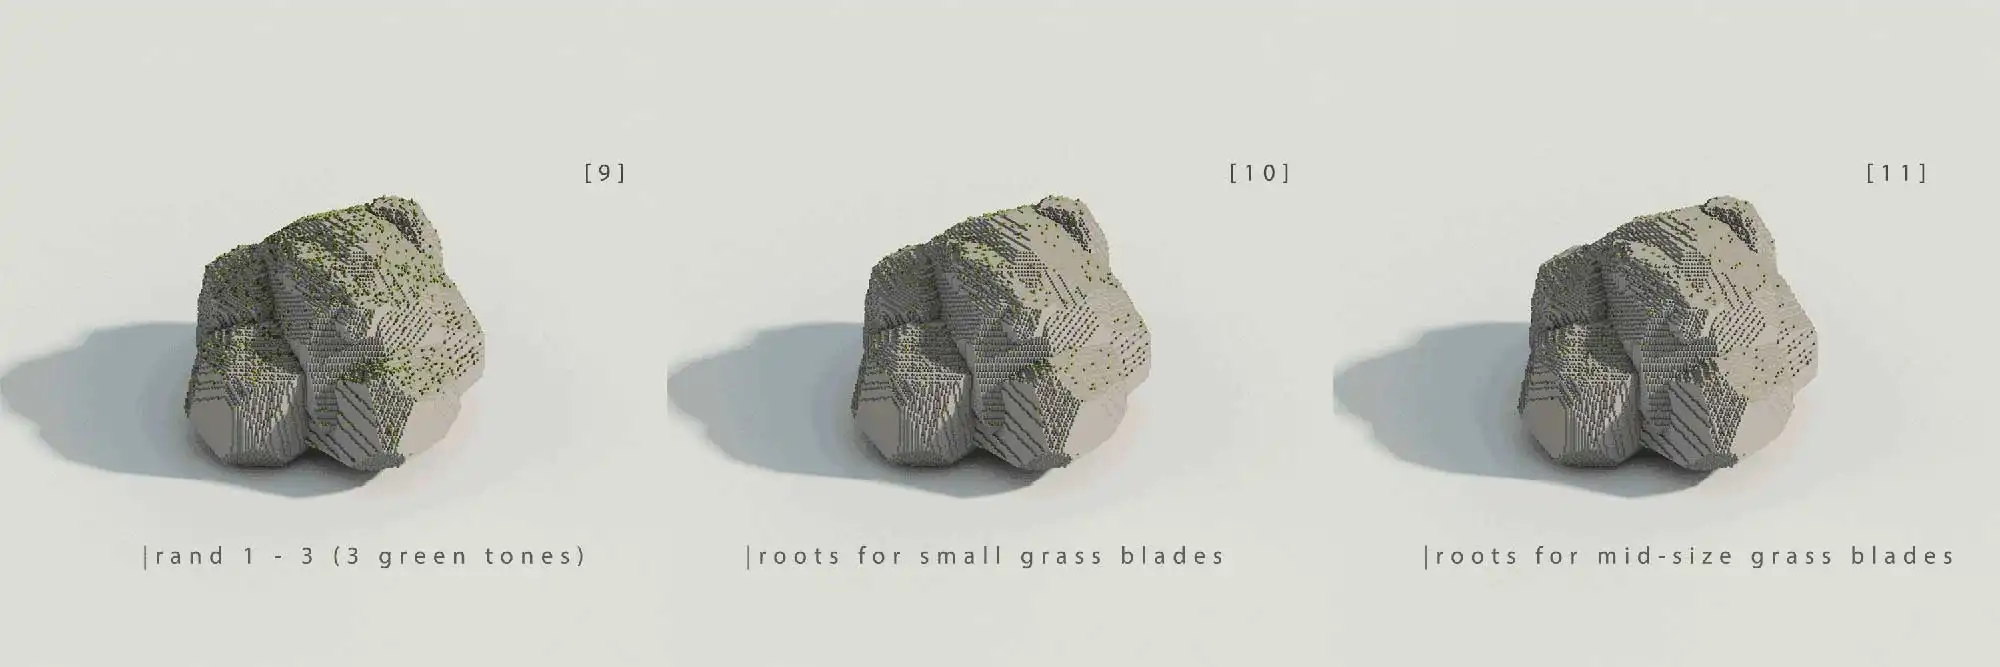
Looks good so far. We execute rand command ‘rand 1 - 3’ once again on the remaining voxels and apply 3 different tones of green to those randomized voxels [9]. Now we make 2 copies (object #5 & object #6) of the resulting grass blade roots (object #4). In object #4 we delete all voxels that correspond to the 2nd and 3rd green tone [10]. In object #5 we do the same for green the 3rd and 1st green tone [11]. In object #6 we repeat that step for 2nd and 1st green tone. Now, we have 3 different objects that correspond to 1 unique green tone. By doing so, we created the individual grass blade roots for different grass heights. Let us say that 1st green tone will be used for small grass blades (object #4) [10], 2nd green tone for mid-sized grass blades (object #5) [11] and 3rd green tone for tall grass blades (object #6).

Tut 4

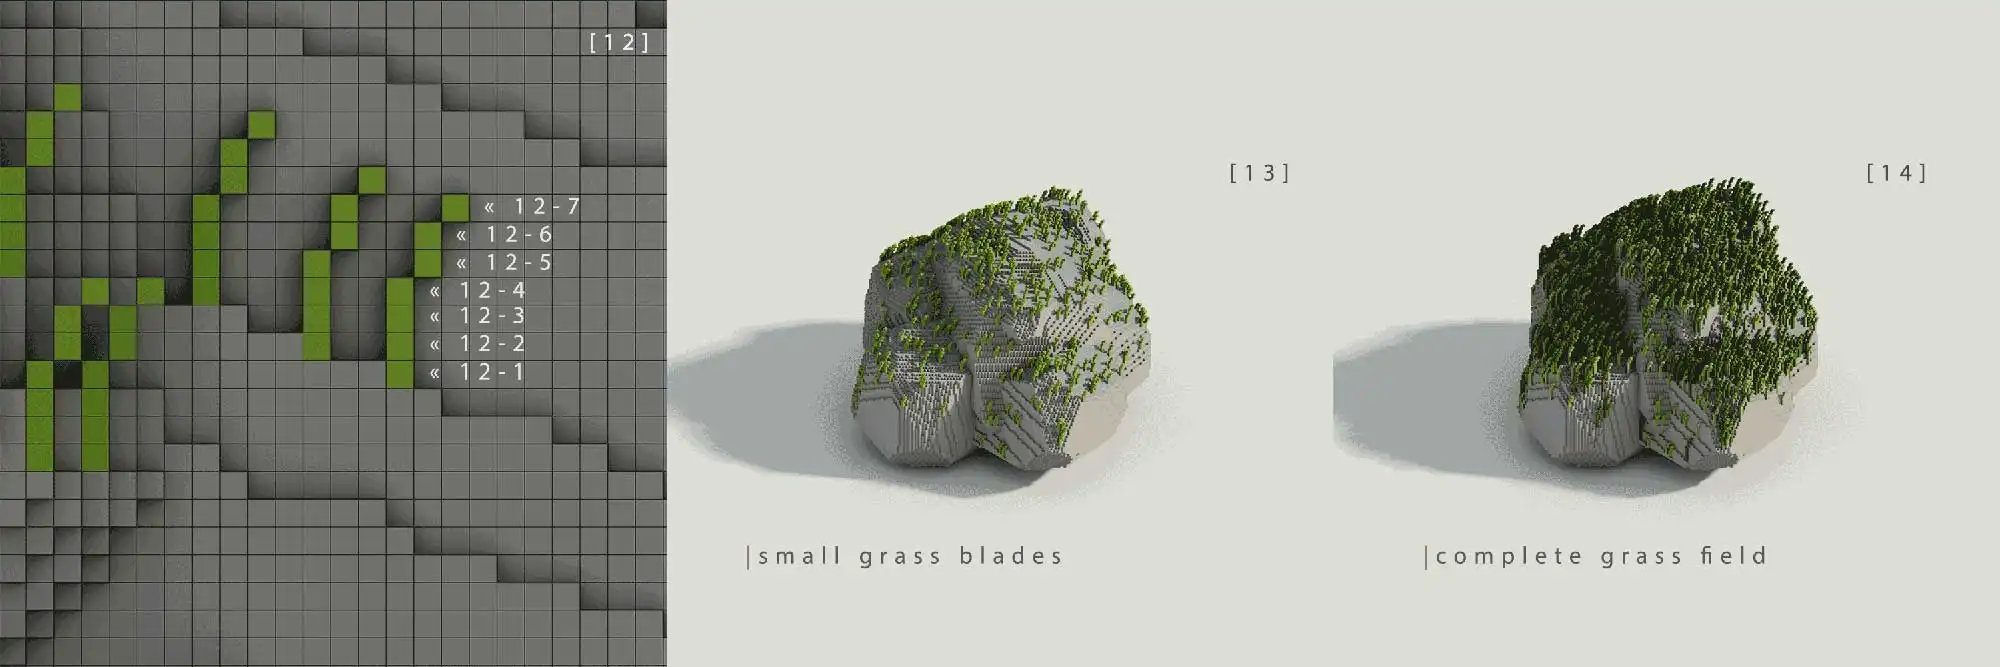
Finally, we model - or better say grow - the grass blades. We start with object #4 that corresponds to the 1st green tone by performing several copy iterations [12].

  • copy object #4 [12-1] and translate it by +1 voxel towards positive z axis [12-2].
  • copy object #4 [12-1] and translate it by +2 voxels towards positive z axis [12-3].
  • copy object #4 [12-1] and translate it by +3 voxels towards positive z axis [12-4].
  • copy object #4 [12-1]and translate it by +4 voxels towards positive z axis, and by +1 voxel t2owards x axis [12-5].
  • copy object #4 [12-1 and translate it by +5 voxels towards positive z axis, and by +1 voxel towards x axis [12-6].
  • copy object #4 [12-1] and translate it by +6 voxels towards positive z axis, and by +2 voxels towards x axis [12-7].
  • Finally, our small grass blade configuration is ready [13]. We repeat that approach for the mid-sized grass and for the tall grass blades [14]. We increase the height solely by adding additional copy iterations. That is all we did it!

This approach is a powerful time saver, and a key to generate defined vegetation on a large scale. We can place complex grass or other defined low-level ground vegetation everywhere we want, even inside undercuts or multi-folded surfaces. This approach is also suitable to add snow on object surfaces. Additionally, due to this approach we have full control over each specific height layer of all individual grass blades which is opening the door to frame-by-frame animations of vegetation. However, this is a different story, and I am going to address this topic in the future.

Voxel Trees: Trunks & Branches "ボクセルツリー:幹と枝"

Voxel Trees: Foliage "ボクセルツリー:葉っぱ"